

Table of Contents
- Why Intricate Silver Patterns Tarnish Faster in Recesses
- How to Clean Silver Filigree Without Bending Delicate Openwork
- How to Clean Sterling Silver With Aluminum Foil and Baking Soda
- How to Polish Oxidized Silver Jewelry While Keeping the Dark Finish
- Silver Cleaning Mistakes to Avoid on Engraved and Chased Patterns
- Step-by-Step: Removing Oxidation From Repoussé, Filigree, and Chased Details
- When to Stop and Consult a Conservator or Silversmith
- Conclusion
- Frequently Asked Questions
Last Updated: October 15, 2026
Why Intricate Silver Patterns Tarnish Faster in Recesses
Recessed areas trap moisture, dust, and airborne sulfur, and air moves slowly there, so the dark layer builds first in the deep lines and stays longer.
At ABC Rugs Kilims & Jewelry, we handle vintage silver with exactly this problem, and the pattern is usually the hardest part to clean.

Tarnish is the unwanted dark film that dulls silver. Patina is a controlled, intentional dark finish makers apply to bring out pattern depth.
Tarnish Versus Intentional Dark Patina: How to Tell the Difference
Intentional oxidation sits in the recesses only: even, dark, stopping at a clean line where the raised design begins. Unwanted tarnish creeps everywhere, flat areas, edges, high points. Quick check: bright raised surfaces with dark grooves only is likely by design; a cloudy, uneven piece is tarnish.
- Even dark grooves + bright high points = likely intentional patina. Leave it alone.
- Dark film on flat surfaces and edges = tarnish. Clean it.
- Uneven, blotchy, or greenish-black = heavy tarnish. Go slow.
How to Clean Silver Filigree Without Bending Delicate Openwork
Filigree is fine wire or thin metal worked into open, lacy patterns. Those thin sections bend easily and catch on cloth, so clean gently and support the piece from behind:
- Set the piece on a soft, folded towel so the openwork is supported.
- Mix a few drops of mild soap in lukewarm water. No harsh detergents.
- Dip a soft-bristled brush and work in small circles over the surface.
- Rinse by dipping, not by running water, which can bend thin wires.
- Pat dry with a soft cloth and let it air-dry fully before storing.
Skip the polishing cloth on openwork. The fibers snag on thin wires and pull them out of shape. A soft brush does the job without the risk.
How to Clean Sterling Silver With Aluminum Foil and Baking Soda
The aluminum foil and baking soda method is the fastest way to remove oxidation from a piece with recessed detail, because the reaction reaches grooves a cloth cannot. The sulfur bonded to the silver migrates to the aluminum and the silver sulfide converts back to silver. That same efficiency is the problem: the reaction does not know which dark areas you wanted to keep, so it brightens the whole surface at once, including the controlled oxidation that defines the pattern.
When the foil method is the right call
- Plain sterling silver or silver plate with no applied dark finish
- Pieces where tarnish has spread across flat areas and high points, not just grooves
- Heavily tarnished pieces where you want an even, full bright clean
When to skip it entirely
- Silver plate. Generally safe, but plate that is worn thin, flaking, or showing base metal should not go in, the solution accelerates failure of an already compromised layer.
- Soldered pieces. Older silver often uses lead-tin or soft solder, and hot solution plus prolonged contact can weaken or discolor those joints. If you see a seam, treat it as soldered.
- Set gemstones. Opals, pearls, turquoise, and dyed or treated materials are damaged by heat, salt, or both. Pearls should never touch this solution.
The method, with the details that matter
- Line a glass or ceramic bowl with aluminum foil, shiny side up. A metal bowl changes the reaction.
- Add one tablespoon of baking soda and one teaspoon of salt. The salt drives the reaction; baking soda alone is much slower.
- Pour in hot water, not boiling, boiling risks stones, adhesives, and thin solder without speeding the reaction enough to justify it.
- Stir until the powders dissolve.
- Lay the silver on the foil so it directly contacts the aluminum; contact completes the circuit, and a piece resting on another will not react evenly.
- Check at two minutes. Most light tarnish is gone by then; heavy tarnish may need up to five. Do not walk away.
- Pull the piece out, rinse with lukewarm water, pat dry, then dry again with a soft cloth, trapped moisture in recesses causes new tarnish within days.
If you use it on a patterned piece anyway
You can still use the foil method on intricate silver if you protect the recesses first. Apply a thin coat of microcrystalline wax with a toothpick to the dark grooves, let it set, run the foil method, then remove the wax with a soft brush and mild soap. It is slower than a plain dip, but it is the only way to get the speed of the reaction without losing the contrast.

How to Polish Oxidized Silver Jewelry While Keeping the Dark Finish
Jewelry with a darkened finish needs the opposite approach: brighten the raised design and protect the dark recesses. The rule is polish the high points, never the grooves.
- Wrap a soft cloth around your fingertip for control.
- Use a tiny amount of silver polish on the raised areas only.
- Keep the cloth flat so it does not dip into the recesses.
For hard-to-reach spots, a cotton swab gives precision: dip it lightly, touch only the raised surface, and swap it out when it turns black. On heavily tarnished pieces, work in small sections, rushing is how polish ends up in the grooves and the contrast disappears.
Silver Cleaning Mistakes to Avoid on Engraved and Chased Patterns
Chased and engraved patterns have fine lines cut into the metal that hold tarnish, and anything you put on them. A few habits cause most of the damage.
- Using an abrasive cleaner. It scratches the surface and dulls the raised shine.
- Soaking too long. Long soaks can lift plating and loosen set stones.
- Scrubbing with a rough cloth. It wears down fine engraved lines over time.
The fix for most of these is simple: go slow, use soft tools, and dry completely. To slow tarnish between cleanings, store silver in a tarnish-resistant cloth or bag, away from rubber bands and wool.
Step-by-Step: Removing Oxidation From Repoussé, Filigree, and Chased Details
Repoussé, filigree, and chased work all share one trait: deep recesses that hold tarnish. The goal is to lift oxidation out of those recesses without erasing the pattern or the contrast around it, which takes the right tool for the depth, controlled moisture, and a decision about whether the dark areas are supposed to be there.
Step 1: Read the construction before you read the tarnish
Look at how the piece is built, not just how it looks. The construction decides which methods are safe.
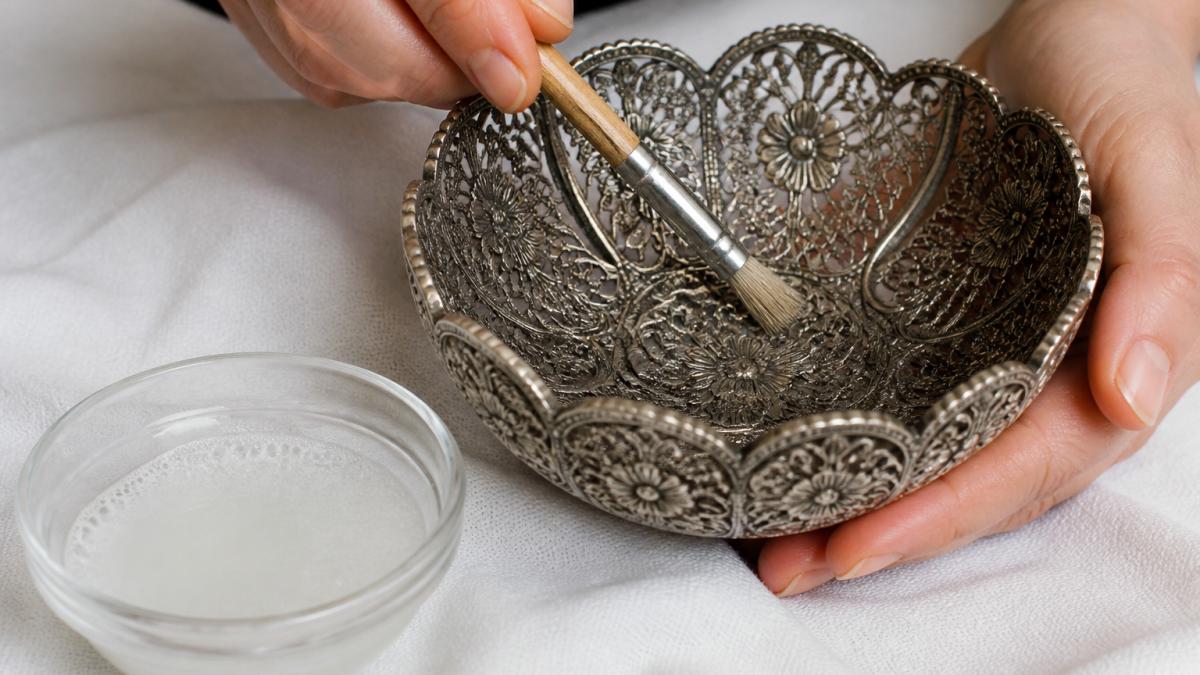
Vintage Silver Ornate Filigree Bowl →
- Solid cast or die-struck with raised pattern. Most forgiving: mild soap, soft brush, and foil method are all on the table.
- Repoussé (raised from the back). Metal is thinner at the highest points, and front pressure can push them flat. Support from behind with your palm or a folded towel.
- Chased (pattern pushed in from the front). Lines are compressed metal and their edges collect tarnish. A brush reaches them; a cloth does not.
Step 2: Decide whether the dark areas are tarnish or design
This single decision determines whether the piece looks better or worse when you are done.
- Even dark grooves, bright high points, clean line between them = intentional patina. Clean the high points only.
- Dark film across flat areas, edges, and high points = tarnish. Clean the whole piece.
- Blotchy, uneven, or greenish-black = heavy tarnish, often with surface contamination underneath. Go slow and expect to repeat.
Step 3: Choose your tools by depth, not by habit
A polishing cloth is the wrong tool for a recessed pattern: it rides over the high points, never reaches the grooves, and snags on openwork. What you want instead:
- Soft-bristled brush. A baby toothbrush, soft makeup brush, or natural-bristle silver brush. Bristles should flex under light finger pressure; if they feel stiff, they are too stiff.
- Cotton swabs. Precision work on raised areas only. Swap them out as soon as they turn black, a loaded swab smears tarnish back into the grooves.
- Soft cotton cloth. For drying and polishing high points, not scrubbing.
What not to use: metal picks, toothpicks as scrapers, stiff-bristled brushes, abrasive creams, and ultrasonic cleaners on pieces with set stones, glued parts, or fragile openwork. An ultrasonic cleaner is safe on solid sterling but can shake loose a stone or soldered joint, and it does nothing for intentional patina except strip it.
Step 4: Clean in stages, drying between them
- Identify the piece. Check for a "sterling" stamp, a "925" mark, or a "silver on copper" mark, this tells you how gentle to be and whether base metal is exposed.
- Decide your goal. Full bright clean, or keep the dark contrast? This changes your method and tools.
- Start with mild soap and lukewarm water. A few drops of dish soap in a bowl. No harsh detergents, ammonia, lemon juice, or vinegar.
- Work the recesses with a soft-bristled brush. Small circles, light pressure, one area at a time. Dip the brush, not the piece, and keep the piece out of standing water.
- Rinse by dipping. Dip in a bowl of clean lukewarm water or wipe with a damp cloth. Do not run water over filigree or any piece with loose components.
- Dry completely. Blot with a soft cloth, then air-dry at least an hour before storing. Recesses hold moisture longer than flat surfaces, and trapped moisture causes new tarnish within days.
- Polish only the raised surfaces. A soft cloth wrapped around your fingertip, a tiny amount of polish, flat contact so the cloth does not dip into the grooves.
- Recheck in raking light. Hold the piece at an angle to a lamp, raking light shows missed spots and residue that straight-on light hides.
- Repeat only if needed. If the piece is still dark after one pass, wait a day. Some tarnish lifts slowly, and repeated passes in one session over-polish the high points.
For a piece like our Vintage Silver Ornate Filigree Bowl, the pierced openwork and scalloped rim mean many small recesses, exactly where a soft brush beats a polishing cloth and dipping beats rinsing.
Step 5: Know when the piece is telling you to stop
Stop cleaning and reassess if:
- The high points get brighter but the pattern gets flatter, you are removing contrast, not tarnish.
- The metal feels warm or the surface looks slightly matte, you are over-working it.
- A stone, joint, or applied element moves. Stop, dry the piece, and get it looked at.
If the piece is antique, signed, heavily damaged, or valuable enough that a mistake would matter, stop before you start and hand it to a conservator or silversmith. They can clean and stabilize a piece without stripping its finish or its history, and on collectible silver the finish and marks are part of the value.
When to Stop and Consult a Conservator or Silversmith
Some pieces should never be cleaned at home. Get expert help if you see:
- Loose or missing stones
- Cracks, splits, or bent openwork
- Flaking or worn plating that shows the base metal
At ABC Rugs Kilims & Jewelry, we treat every antique piece as a collectible first. Our Antique English Silver-on-Copper Salt Shaker shows how much fine hand-chased detail a small piece can carry, and how easily a heavy hand flattens it.

Conclusion
Cleaning intricate silver is a test of restraint: the patterns that look dirtiest often need the lightest touch, and the fastest methods are the ones most likely to erase the detail you love. Start with mild soap and a soft brush.
If you would rather skip the risk, browse our curated collection of vintage silver and antique pieces at ABC Rugs Kilims & Jewelry.
Frequently Asked Questions
How do I remove tarnish from intricate silver patterns without damaging the dark recesses?
Use a two-step approach. First, wash the piece with mild soap and lukewarm water, using a soft-bristled brush to lift loose tarnish from crevices. Rinse and dry completely. Then apply a small amount of silver polish to a soft cloth and work only the raised surfaces, avoiding the recessed areas where intentional dark patina lives. Rinse again and buff with a clean cloth. For heavy tarnish on sterling pieces, the aluminum foil and baking soda method can work, but limit contact to two to three minutes and check progress often.
Can baking soda scratch detailed silver jewelry?
Baking soda itself is a mild abrasive, so dry scrubbing can leave fine scratches on polished silver surfaces. The risk increases on silver plate, where the thin silver layer can wear through. To clean silver filigree or engraved jewelry safely, dissolve the baking soda in hot water rather than applying it as a paste. Let the chemical reaction lift the tarnish instead of rubbing it away. If you do use a paste on stubborn spots, apply it with a cotton swab and the lightest possible pressure.
Does WD-40 clean tarnished silver?
WD-40 is a lubricant and water displacer, not a silver cleaner. It can loosen surface grime, but it does not reverse the chemical oxidation that causes tarnish. Using it on intricate silver patterns risks leaving an oily residue trapped in recesses, which attracts dust and can darken over time. Stick with methods designed for silver: mild soap and water, aluminum foil and baking soda, or a dedicated silver polish. Reserve WD-40 for hinges and hardware.
When should antique or silver-plated pieces be cleaned by a professional?
Consult a conservator or silversmith when the piece has flaking plate, active green corrosion, loose or missing stones, or soldered joints that may weaken in water. Silver plate on copper or Britannia metal, like many Victorian-era pieces, has a thin silver layer that aggressive polishing can wear through permanently. If you are unsure whether a dark area is tarnish or intentional patina, or if the item has historical or sentimental value, professional assessment costs far less than restoration.


